 Javassist字节码工具开发记录
# Javassist字节码工具开发记录
# 1、JavaAgent
打算趁着空闲时间开发一个小工具,用来做线上字节码调试,仿照阿里的Arthas,做一个带有可视化界面的工具
# 1.1、动态Attach到目标进程
1、首先新建一个Maven项目[ ByteCodeTool ],pom文件如下所示:
<project xmlns="http://maven.apache.org/POM/4.0.0" xmlns:xsi="http://www.w3.org/2001/XMLSchema-instance"
  xsi:schemaLocation="http://maven.apache.org/POM/4.0.0 http://maven.apache.org/xsd/maven-4.0.0.xsd">
  <modelVersion>4.0.0</modelVersion>

  <groupId>org.example</groupId>
  <artifactId>ByteCodeTool</artifactId>
  <version>1.0-SNAPSHOT</version>
  <packaging>jar</packaging>

  <name>ByteCodeTool</name>

  <properties>
    <project.build.sourceEncoding>UTF-8</project.build.sourceEncoding>
  </properties>

  <dependencies>
    <dependency>
      <groupId>org.javassist</groupId>
      <artifactId>javassist</artifactId>
      <version>3.28.0-GA</version>
    </dependency>
    <dependency>
      <groupId>net.bytebuddy</groupId>
      <artifactId>byte-buddy-agent</artifactId>
      <version>1.12.14</version>
    </dependency>
    <dependency>
      <groupId>com.sun.tools</groupId>
      <artifactId>attach</artifactId>
      <version>8</version>
    </dependency>
  </dependencies>
  <build>
    <plugins>
      <plugin>
        <groupId>org.apache.maven.plugins</groupId>
        <artifactId>maven-compiler-plugin</artifactId>
        <configuration>
          <source>8</source>
          <target>8</target>
        </configuration>
      </plugin>
      <plugin>
        <groupId>org.apache.maven.plugins</groupId>
        <artifactId>maven-shade-plugin</artifactId>
        <version>3.5.0</version>
        <configuration>
          <transformers>
            <transformer implementation="org.apache.maven.plugins.shade.resource.ManifestResourceTransformer">
              <manifestEntries>
                <Main-Class>org.example.AttachAgent</Main-Class>
                <Agent-Class>org.example.MyAgent</Agent-Class>
                <Can-Retransform-Classes>true</Can-Retransform-Classes>
              </manifestEntries>
            </transformer>
          </transformers>
        </configuration>
        <executions>
          <execution>
            <phase>package</phase>
            <goals>
              <goal>shade</goal>
            </goals>
          </execution>
        </executions>
      </plugin>
    </plugins>
  </build>

</project>
2
3
4
5
6
7
8
9
10
11
12
13
14
15
16
17
18
19
20
21
22
23
24
25
26
27
28
29
30
31
32
33
34
35
36
37
38
39
40
41
42
43
44
45
46
47
48
49
50
51
52
53
54
55
56
57
58
59
60
61
62
63
64
65
66
67
68
69
70
71
2、新建MyAgent类
package org.example;

import javassist.*;

import java.lang.instrument.Instrumentation;

/**
 * @author zhaoyubo
 * @title MyAgent
 * @description 动态Attach
 * @create 2024/1/17 10:19
 **/
public class MyAgent {
    public static void agentmain(String agentArgs, Instrumentation inst) {
        try {
            System.out.println("+++++++++++++++++++++Attach success+++++++++++++++++++++");
        } catch (Exception e) {
            e.printStackTrace();
        }
    }
}
2
3
4
5
6
7
8
9
10
11
12
13
14
15
16
17
18
19
20
21
3、新增AttachAgent启动类
package org.example;

import com.sun.tools.attach.VirtualMachine;
import com.sun.tools.attach.VirtualMachineDescriptor;

import java.net.URL;
import java.nio.file.Paths;
import java.util.Comparator;
import java.util.List;
import java.util.Scanner;

/**
 * @author zhaoyubo
 * @title AttachAgent
 * @description 参考Arthas动态获取java进程ID,动态Attach
 * @create 2024/1/17 10:20
 **/
public class AttachAgent {
    public static void main(String[] args) {
        MainConfig.mainPkg = args[0];
        // 获取当前运行的 Java 进程的 PID
        String pid = "";
        Scanner scanner = new Scanner(System.in);
        List<VirtualMachineDescriptor> jps = VirtualMachine.list();
        jps.sort(Comparator.comparing(VirtualMachineDescriptor::displayName));
        int i = 0;
        for (; i < jps.size(); i++) {
            System.out.printf("[%s] %s %s%n", i, jps.get(i).id(), jps.get(i).displayName());
        }
        System.out.printf("[%s] %s%n", i, "Custom PID");
        System.out.println(">>>>>>>>>>>>Please enter the serial number");
        while (true) {
            int index = scanner.nextInt();
            if (index < 0 || index > i) continue;
            if (index == i) {
                System.out.println(">>>>>>>>>>>>Please enter the PID");
                pid = String.valueOf(scanner.nextInt());
                break;
            }
            pid = jps.get(index).id();
            break;
        }
        try {
            // 附加代理到 Java 进程
            VirtualMachine vm = VirtualMachine.attach(pid);
            URL jarUrl = MyAgent.class.getProtectionDomain().getCodeSource().getLocation();
            String curJarPath = Paths.get(jarUrl.toURI()).toString();
            vm.loadAgent(curJarPath,MainConfig.mainPkg);
            System.out.println("*** Attach finish ***");
            MainFrame.out();
        } catch (Exception e) {
            e.printStackTrace();
        }
    }
}
2
3
4
5
6
7
8
9
10
11
12
13
14
15
16
17
18
19
20
21
22
23
24
25
26
27
28
29
30
31
32
33
34
35
36
37
38
39
40
41
42
43
44
45
46
47
48
49
50
51
52
53
54
55
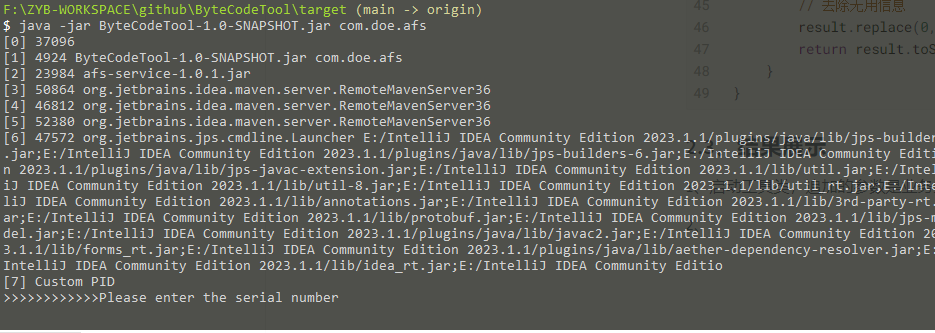
4、启动,测试
工具进程窗口:
> java -jar ByteCodeTool-1.0-SNAPSHOT.jar
[0] 2992
[1] 3256 ByteCodeTool-1.0-SNAPSHOT.jar
[2] 43476 afs-service-1.0.1.jar
[3] 1764 org.example.MainFrame
[4] 18336 org.jetbrains.idea.maven.server.RemoteMavenServer36
[5] Custom PID
++++++++++++++Please enter the serial number+++++++++++++++
2
++++++++++++The PID is 43476++++++++++++
++++++++++++Attach finish++++++++++++

被Attach的进程窗口:
> +++++++++++++++++++++Attach success+++++++++++++++++++++
2
3
4
5
6
7
8
9
10
11
12
13
14
15
# 1.2、开启轻量服务器
在Attach进程之后,需要开启一个轻量级的http服务器,这样就可以通过动态的传递参数来进行字节码修改,对于服务器选择了开源的**smart-http (opens new window)**,具体代码如下:
public class MyAgent {
    public static void agentmain(String agentArgs, Instrumentation inst) {
        try {
            // 保存全局配置
            MainConfig.inst = inst;
            MainConfig.mainPkg = agentArgs;
            // 开启http服务
            startHttp(agentArgs, inst.getAllLoadedClasses());
        } catch (Exception e) {
            e.printStackTrace();
        }
    }

    /**
     * @description 开启Http服务
     * @param agentArgs
     * @param allLoadedClasses
     * @return void
     * @author zhaoyubo
     * @time 2024/1/26 10:01
     **/
    public static void startHttp(String agentArgs, Class[] allLoadedClasses) {
        // 启动一个服务接口,供外部进行服务调用,进行动态字节码操作
        // 创建HttpServer服务器
        HttpBootstrap bootstrap = new HttpBootstrap();
        bootstrap.configuration().debug(true);
        // 1. 实例化路由Handle
        bootstrap.httpHandler(JadController.getAllPackage(allLoadedClasses, agentArgs));
        // 2. 启动服务
        bootstrap.configuration().bannerEnabled(false).debug(false);
        bootstrap.setPort(MainConfig.HTTP_PORT);
        bootstrap.start();
    }
}
2
3
4
5
6
7
8
9
10
11
12
13
14
15
16
17
18
19
20
21
22
23
24
25
26
27
28
29
30
31
32
33
34
客户端使用Swing构建一个操作界面,Swing使用了开源的**beautyeye (opens new window)**进行美化。
public class MainFrame {

    public static void out() {
        try{
            BeautyEyeLNFHelper.launchBeautyEyeLNF();
            UIManager.put("RootPane.setupButtonVisible", false);
            //实例化一个JFrame对象
            JFrame frame = new JFrame("ByteCodeTool");
            frame.setContentPane(new TabPane());
            frame.setVisible(true);
            frame.pack();//使窗体可视
            frame.setSize(1000, 850);//设置窗体显示位置和大小
        }catch(Exception e){
        }
    }
}
2
3
4
5
6
7
8
9
10
11
12
13
14
15
16
# 2、增加字节码反编译功能
# 2.1、生成代码目录树
目前的设计是想要做一个能展示线上源代码目录的Tree结构,然后通过双击源码文件名来展示反编译的java代码
Tree结构使用Swing来做,并且注册双击事件,得到源码class的文件名,最后通过Javassist来反编译得到java文件,在Swing页面做展示
首先增加一个动态的源码树节点,并增加叶子节点的双击事件,代码如下“:
public class JadPkgTree {

    public static JTree tree = new JTree();

    public static JTree of() throws InterruptedException {
        HttpClient httpClient = new HttpClient("127.0.0.1", MainConfig.HTTP_PORT);
        CountDownLatch cd = new CountDownLatch(1);
        httpClient.get("/all").onSuccess(response -> {
            try {
                ClassObj clazz = new ObjectMapper().readValue(response.body().getBytes(), ClassObj.class);
                MainConfig.classObj = clazz;
                DefaultMutableTreeNode jTreeRoot = buildTree(clazz.getClassName());
                tree = new JTree(jTreeRoot);
                tree.expandRow(1);
                tree.addMouseListener(new MouseAdapter() {
                    @Override
                    public void mouseClicked(MouseEvent e) {
                        // 如果在这棵树上点击了2次,即双击
                        if (e.getSource() == tree && e.getClickCount() == 2) {
                            // 按照鼠标点击的坐标点获取路径
                            TreePath selPath = tree.getPathForLocation(e.getX(), e.getY());
                            if (selPath != null)// 谨防空指针异常!双击空白处是会这样
                            {
                                // 获取这个路径上的最后一个组件,也就是双击的地方
                                DefaultMutableTreeNode node = (DefaultMutableTreeNode)selPath.getLastPathComponent();
                                // 调用反编译
                                String result = JadMain.decompile(clazz.getJarPath(), node.toString());
                                // 把这些反编译完成的代码展示到右侧的文本组件中
                                MainConfig.jadText.setText(result);
                            }
                        }

                    }
                });
                cd.countDown();
            } catch (Exception ex) {
                cd.countDown();
            }
        }).onFailure(Throwable::printStackTrace).done();
        // 等待调用完成再返回结果
        cd.await();
        return tree;
    }

    public static DefaultMutableTreeNode buildTree(List<String> classNames) {
        Node root = new Node("代码目录", 0);
        for (String className : classNames) {
            String[] parts = className.split("\\.");

            Node currentNode = root;
            for (String part : parts) {
                Node childNode = findChildNode(currentNode, part);

                if (childNode == null) {
                    int nodeType = (part.equals(parts[parts.length - 1])) ? 2 : 1;
                    childNode = new Node(part, nodeType);
                    currentNode.addChildNode(childNode);
                }

                currentNode = childNode;
            }
        }

        optimizeTree(root);
        return convertToJTree(root);
    }

    public static DefaultMutableTreeNode convertToJTree(Node node) {
        DefaultMutableTreeNode jTreeNode = new DefaultMutableTreeNode(node.nodeName);
        for (Node childNode : node.childNodes) {
            jTreeNode.add(convertToJTree(childNode));
        }
        return jTreeNode;
    }

    public static Node findChildNode(Node node, String nodeName) {
        for (Node childNode : node.childNodes) {
            if (childNode.nodeName.equals(nodeName)) {
                return childNode;
            }
        }
        return null;
    }

    public static void optimizeTree(Node node) {
        if (node.nodeType == 1 && node.pkgNum == 1 && node.fileNum == 0) {
            Node childNode = node.childNodes.get(0);
            optimizeTree(childNode);
            node.childNodes = childNode.childNodes;
            node.pkgNum = childNode.pkgNum;
            node.nodeName = node.nodeName + "." + childNode.nodeName;
            node.nodeType = childNode.nodeType;
        }

        for (Node childNode : node.childNodes) {
            optimizeTree(childNode);
        }
    }

    static class Node {
        String nodeName;
        List<Node> childNodes;
        public int nodeType; // 1 for package, 2 for file
        Integer totalNum = 0;
        Integer pkgNum = 0;
        Integer fileNum = 0;

        public Node(String nodeName, int nodeType) {
            this.nodeName = nodeName;
            this.nodeType = nodeType;
            this.childNodes = new ArrayList<>();
            this.fileNum = 0;
        }

        public void addChildNode(Node childNode) {
            this.childNodes.add(childNode);
            if (childNode.nodeType == 1) {
                this.pkgNum += childNode.pkgNum + 1; // 加上当前节点自身
            }
            if (childNode.nodeType == 2) {
                this.fileNum += childNode.fileNum + 1; // 加上当前节点自身
            }
            this.totalNum += childNode.totalNum + 1; // 加上当前节点自身
        }
    }

}
2
3
4
5
6
7
8
9
10
11
12
13
14
15
16
17
18
19
20
21
22
23
24
25
26
27
28
29
30
31
32
33
34
35
36
37
38
39
40
41
42
43
44
45
46
47
48
49
50
51
52
53
54
55
56
57
58
59
60
61
62
63
64
65
66
67
68
69
70
71
72
73
74
75
76
77
78
79
80
81
82
83
84
85
86
87
88
89
90
91
92
93
94
95
96
97
98
99
100
101
102
103
104
105
106
107
108
109
110
111
112
113
114
115
116
117
118
119
120
121
122
123
124
125
126
127
# 2.2、反编译字节码
使用开源的CFR包进行字节码反编译
<!-- CFR -->
<dependency>
    <groupId>org.benf</groupId>
    <artifactId>cfr</artifactId>
    <version>0.151</version>
</dependency>
2
3
4
5
6
编写主要代码:
public class JadMain {

    public static String decompile(String classFilePath, String methodName) {
        return decompile(classFilePath, methodName, false);
    }

    /**
     * @param classFilePath
     * @param className
     * @param hideUnicode
     * @return
     */
    public static String decompile(String classFilePath, String className, boolean hideUnicode) {
        final StringBuilder result = new StringBuilder(8192);

        OutputSinkFactory mySink = new OutputSinkFactory() {
            @Override
            public List<SinkClass> getSupportedSinks(SinkType sinkType, Collection<SinkClass> collection) {
                return Arrays.asList(SinkClass.STRING, SinkClass.DECOMPILED, SinkClass.DECOMPILED_MULTIVER,
                    SinkClass.EXCEPTION_MESSAGE);
            }

            @Override
            public <T> Sink<T> getSink(final SinkType sinkType, SinkClass sinkClass) {
                return sinkable -> {
                    if (sinkType == SinkType.PROGRESS) {
                        return;
                    }
                    result.append(sinkable);
                };
            }
        };

        HashMap<String, String> options = new HashMap<>();
        options.put("showversion", "false");
        options.put("hideutf", String.valueOf(hideUnicode));
        if (!StringUtils.isBlank(className)) {
            options.put("jarfilter", className);
        }

        CfrDriver driver = new CfrDriver.Builder().withOptions(options).withOutputSink(mySink).build();
        List<String> toAnalyse = new ArrayList<>();
        toAnalyse.add(classFilePath);
        driver.analyse(toAnalyse);
        // 去除无用信息
        result.replace(0, result.lastIndexOf("package"), "");
        return result.toString();
    }
}
2
3
4
5
6
7
8
9
10
11
12
13
14
15
16
17
18
19
20
21
22
23
24
25
26
27
28
29
30
31
32
33
34
35
36
37
38
39
40
41
42
43
44
45
46
47
48
49
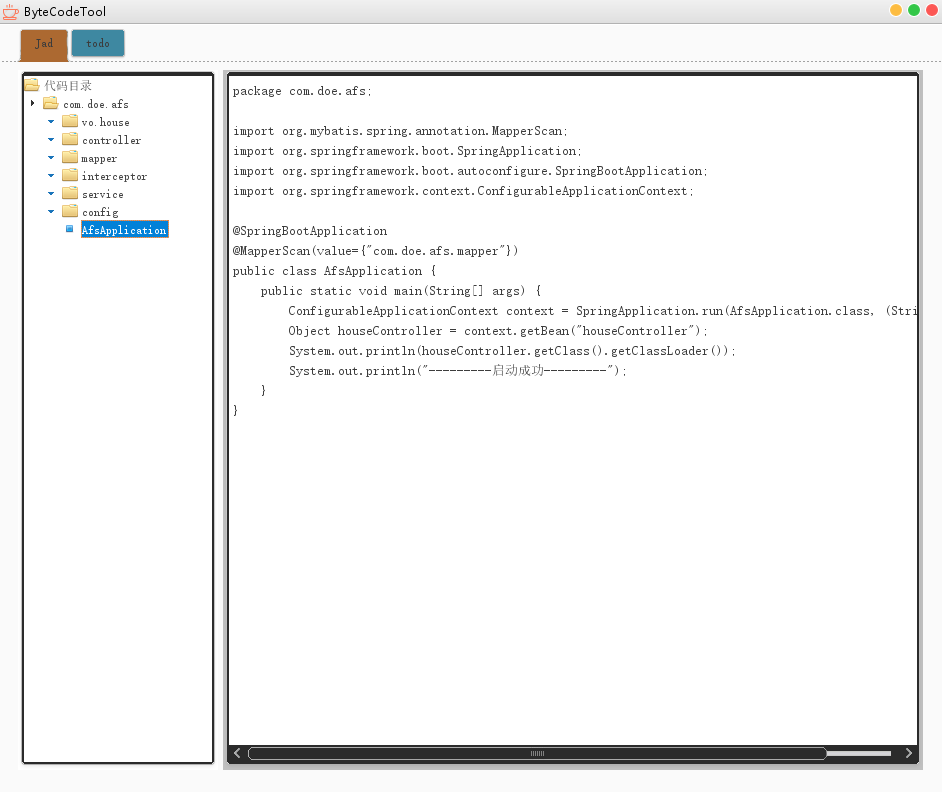
# 2.3、结果展示
1、启动工具类,追加的参数是业务主要的代码包路径
2、输入需要attach的序号,比如 2

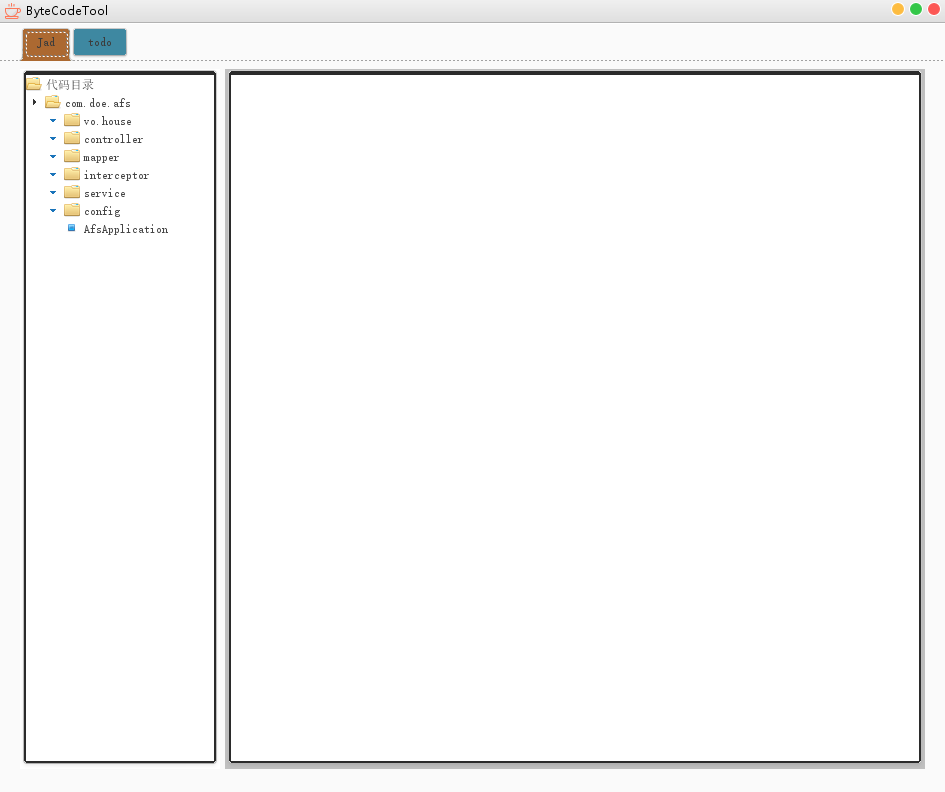
3、双击需要反编译的类,右侧就会实时展示反编译之后的java代码
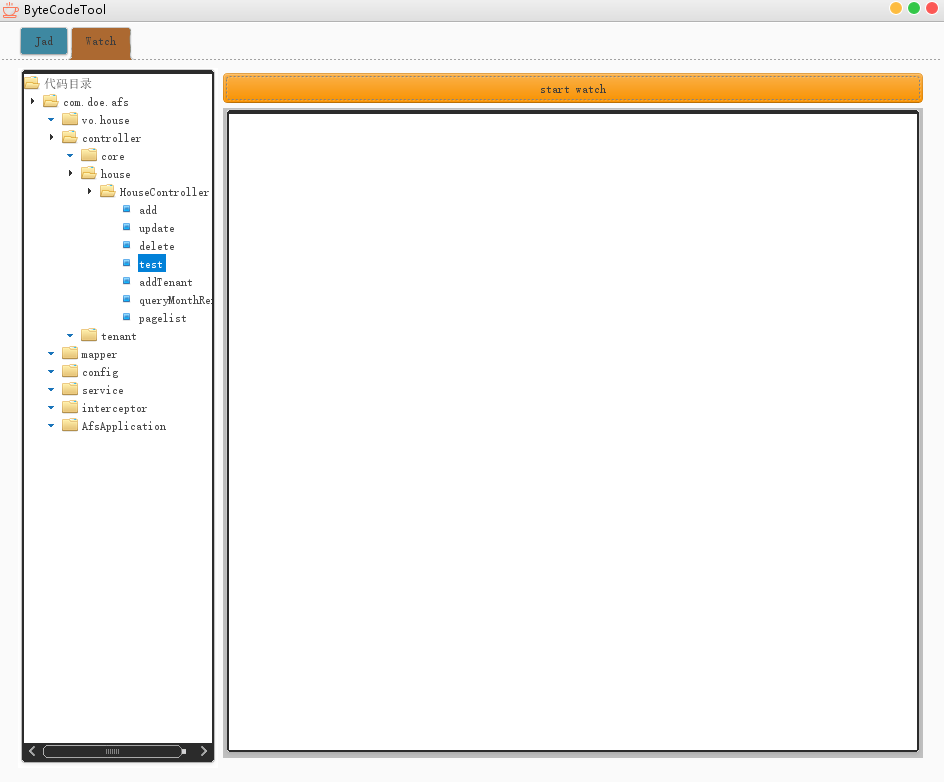
# 3、增加单个方法的Watch功能
# 3.1、UI界面选择方法
首先,UI页面把源码Tree结构做改造,叶子节点原先是类名,要修改为方法名,核心修改代码如下:
// 增加方法结果
String fileName = name.substring(name.lastIndexOf(".") + 1, name.length());
Method[] declaredMethods = allLoadedClass.getDeclaredMethods();
List<String> methodList = new ArrayList<>();
for (Method declaredMethod : declaredMethods) {
    String methodName = declaredMethod.getName();
    methodList.add(methodName);
}
methodMap.put(fileName, methodList);

classObj.setMethodList(methodMap);
2
3
4
5
6
7
8
9
10
11
然后增加选中事件,在UI界面选中某个方法之后,把方法名字进行保存
TreeSelectionListener treeSelectionListener = treeSelectionEvent -> {
    JTree treeSource = (JTree)treeSelectionEvent.getSource();
    TreePath[] selectionPaths = treeSource.getSelectionPaths();
    if (null != selectionPaths) {
        MainConfig.watchMethod.remove();
        for (TreePath selectionPath : selectionPaths) {
            Object[] path = selectionPath.getPath();
            String fullClass = "";
            String method = "";
            for (int i = 0; i < path.length; i++) {
                if (i == 0) {
                    continue;
                } else if (i == 1) {
                    fullClass = fullClass + path[i].toString();
                } else if (i == path.length - 1) {
                    method = path[i].toString();
                } else {
                    fullClass = fullClass + "." + path[i].toString();
                }
            }
            MainConfig.watchMethod.addWatch(fullClass, method);
        }
    }
};
2
3
4
5
6
7
8
9
10
11
12
13
14
15
16
17
18
19
20
21
22
23
24
# 3.2、增加按钮,触发Watch
JButton watchBtn = new JButton("start watch");
watchBtn.setPreferredSize(new Dimension(700, 30));
watchBtn.addActionListener(e -> {
    // 调用watch方法,进行字节码插桩,然后等待请求调用
    MainConfig.watchText.setText("start watch! waiting..........");
    Clint.watch();
});
2
3
4
5
6
7
客户端会把已经选中的方法传入接口里面,然后接口开始使用javassist动态修改字节码文件,给方法添加执行时间参数,打印入参、返回值,把这些需要输出的数据都放入全局配置里面,
WatchTransformer watchTransformer = new WatchTransformer(watchMethod);
MainConfig.inst.addTransformer(watchTransformer, true);
for (Class<?> c : allLoadedClasses) {
    if (c.getName().startsWith("com.doe.afs") && !c.getName().contains("$")) {
        MainConfig.inst.retransformClasses(c);
    }
}
// 进入等待
MainConfig.watchRes.setWait(true);
while (MainConfig.watchRes.isWait()) {
    // 等待watch的目标方法执行
}
MainConfig.inst.removeTransformer(watchTransformer);
response.write(Json.toBytes(MainConfig.watchRes));
2
3
4
5
6
7
8
9
10
11
12
13
14
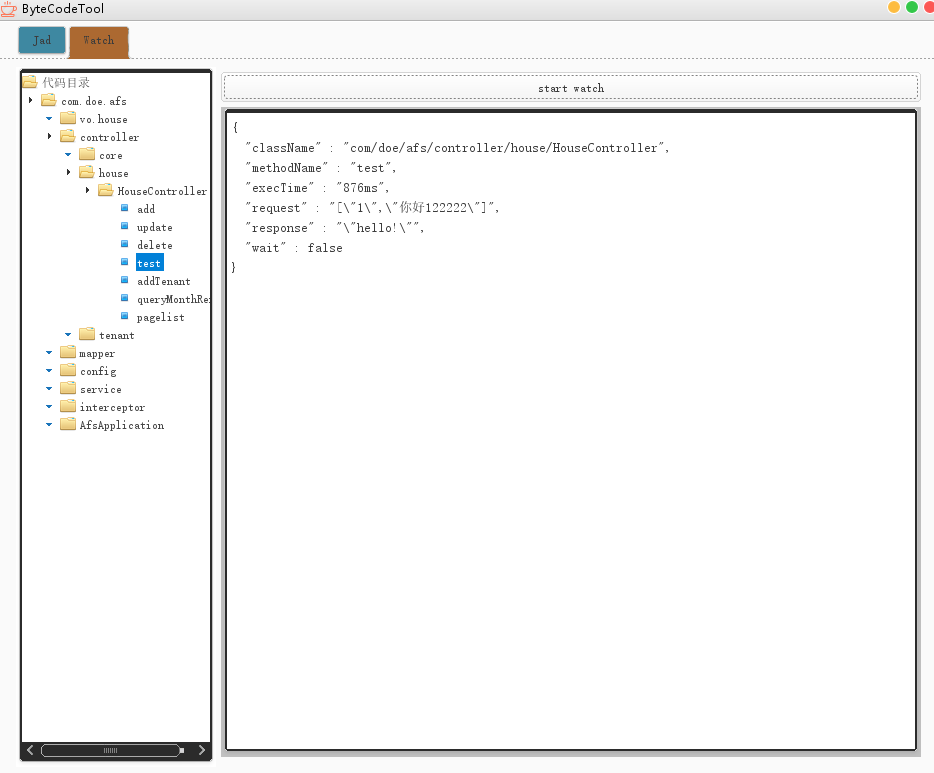
具体的字节码修改代码如下:
CtMethod ctMethod = ctClass.getDeclaredMethod(method);// 得到这方法实例
ctMethod.addLocalVariable("startTime", CtClass.longType);
ctMethod.addLocalVariable("endTime", CtClass.longType);
ctMethod.addLocalVariable("execTime", CtClass.longType);
ctMethod.addLocalVariable("request", MainConfig.classPool.get(String.class.getName()));
ctMethod.addLocalVariable("response", MainConfig.classPool.get(String.class.getName()));
ctMethod.insertBefore("startTime = System.currentTimeMillis();");
ctMethod.insertAfter("endTime = System.currentTimeMillis();");
ctMethod.insertAfter("execTime = endTime - startTime;");
ctMethod.insertAfter("org.byteCode.config.MainConfig.watchRes.setMethodName(\"" + method + "\");");
ctMethod.insertAfter("org.byteCode.config.MainConfig.watchRes.setClassName(\"" + className + "\");");
ctMethod.insertAfter("org.byteCode.config.MainConfig.watchRes.setExecTime(execTime+\"ms\");");
ctMethod.insertAfter("request = org.byteCode.util.Json.toJson($args);");
ctMethod.insertAfter("response = org.byteCode.util.Json.toJson($_);");
ctMethod.insertAfter("org.byteCode.config.MainConfig.watchRes.setRequest(request);");
ctMethod.insertAfter("org.byteCode.config.MainConfig.watchRes.setResponse(response);");
ctMethod.insertAfter("org.byteCode.config.MainConfig.watchRes.setWait(false);");
2
3
4
5
6
7
8
9
10
11
12
13
14
15
16
17
具体展示功能如下图所示:
# 4、Watch支持多方法同时监控
实现思路:使用全局的CountDownLatch,监控n个方法,就定义一个支持n计数器的CountDownLatch,然后通过javassist修改字节码,每个方法执行完毕之后,进行CountDownLatch#countDown()。这样就可以做到,同时监控多个方法,全部执行之后才返回结果的功能。
主要代码如下:
int methodNum = 0;
Map<String, Set<String>> currentWatchMap = watchMethod.currentWatchMap;
Set<String> keySet = currentWatchMap.keySet();
for (String key : keySet) {
    int size = currentWatchMap.get(key).size();
    methodNum = methodNum + size;
}
// 定义计数器
MainConfig.cd = new CountDownLatch(methodNum);
// 进入等待,需要等所有监控的方法都被触发调用才能结束主进程的阻塞
try {
    MainConfig.cd.await();
} catch (InterruptedException e) {
    throw new RuntimeException(e);
}

//字节码修改
ctMethod.insertAfter("org.byteCode.config.MainConfig.cd.countDown();");
2
3
4
5
6
7
8
9
10
11
12
13
14
15
16
17
18